If you like 17th Century carving on oak boxes then you know about using a steel stamp on the backgrounds. I’m now a dabbler in making punches that can stamp a Maltese cross or add a decorative background on my carvings. So far I’ve made two punches for stamping a Maltese cross using some drill rod. However, those now seem oversized so I used smaller diameter materials to make two more. I also invested in a couple knife shaped files for cutting the rest of my steel stamps. My last two stamps were made using a worn out screwdriver and a large cut nail. It is harder than it looks to carefully file away the metal so it gives you the desired impression when struck with a hammer.
Fortunately, I acquired some steel stamps earlier in my life so I can look at those examples too. I’m kinda surprised that with the popularity of Peter Follansbee’s carvings, his blog, and DVDs with Lie-Nielsen, that someone hasn’t already seized the opportunity to make and sell the steel stamps/punches he routinely uses.
Anyway, it will be cool to make several more stamps/punches and get them correspond to the preferred sizes to reproduce the 17th Century carving designs. Stamping designs into wood goes back pretty far to include stamping names and company names and logos into the ends of wooden planes. It will be interesting to see how these will turn out.
My tale picks up with the vintage vise I recently bought at an antique mall. My purchase of $27, as you’ll soon see, has been rewarded. I am happy to say that the evaporust application, light sanding, and wire brushing made it look like new. I treated the clean metal castings to Rustoleum primer and then a Rustoleum black semi gloss oil enamel coating. I’ll make a new handle out of some scrap walnut. The dog slot will be left empty for now since it made no sense to fabricate a steel one. Perhaps I’ll mill a chunk of wood to fill it for esthetics.
What I opted to do with the vise was to use it on my chairmaker’s bench. This bench is an evolving bench project. In my mind a workbench doesn’t have to be a thing of beauty, but just function well. Practicality and economy kinda dictate that route for me as a woodworker. I still plan to build a nice Roubo bench based on a Chris Schwarz design when time, money, and situation allow. But for now I will tweak the design of this chairmakers bench. The centerpiece of this bench has been the Veritas twin screw vise, but due to the smaller footprint of the bench top, the design didn’t include a tail vise. I admit that I favor having two vises on a bench for a host of reasons. One of which is that I often use my vise for holding spindles so that I can shape them with drawknife and spokeshave for Windsor chairs. So buying this antique vise, and reconditioning it, got me wondering how it might become part of this very stout but smaller bench. By beefing up the dimensions of the undercarriage it showed me that pine/fur stock offers plenty of mass for any hand tool work I’ll do. Bottom line the bench doesn’t move.
With no bench top overhang on the end, I cut a 10 inch by 3/8 inch deep mortise in face of the top stretcher (4 by 4 inch stock) and then mounted the rear jaw flush with the side of the bench. This also required me to cut another mortise about 10 inch by 1 1/8 inch deep on the underside of the stretcher. The only negative that I have with the installation is that the chops have to be fairly wide, 6 inches, to accommodate the installation of the vise. Alternatively, I could have made the chops even wider and passed the vise screw and guide rods through them. The tail vise is mounted at the base of the stretcher versus installing it directly underneath the 3 inch thick top. Judging by the trial fits the rear vise jaw will also include a 3/4 inch thick chop. When I designed the chop for the front vise jaw I realized that it could now include several dog holes in it to give me multi-point hold down capability on the bench from end to end.
My tale of adding a tail vise is to install a vise chop of red oak that is roughly 3 inches thick by 20 inches long. That length gives me 3-4 dog holes for clamping. I would have opted for a shorter length on the vise chop however the installation forced me to mortise the vise dead center on the top stretcher so that the bolts holding down the 3 inch thick bench top were left alone. By using 3 inch stock it eliminates any issues with the depth of the chops.
Consequently, I rigged my tail vise to have a substantial length of about 20 inches versus the 14 1/2 inch length chosen by Chris Schwarz for a Roubo bench. Comments are welcome!
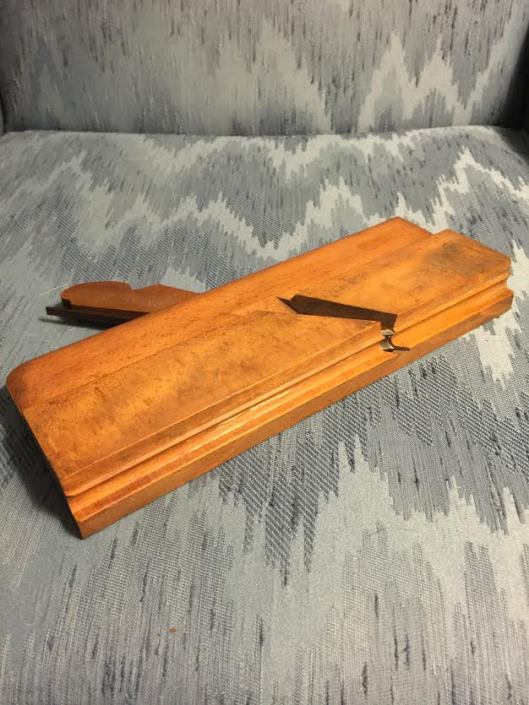
This sweet little jem just arrived and it will make the more eliptical bead I need to finish stretchers on a couple 18th century tavern table projects. I can happily wait on making a pair of snipes bill planes now. I do like the snipes bill planes made by Hackney Tools (http://hackneytools.com/2015/02/making-your-own-moulding-planes/. My jem here is a Sandusky Tool Company 3/8 inch bead molding plane in pretty good condition. You never know what these babies will look like when you purchase them online, but I’m thrilled with it.
I think that I’ll stick with carving spoons at least occasionally, but I am preoccupied now with getting the shape of the stem just right. When I look at a Peter Follansbee spoon, I’m drawn to the graceful curves he often leaves on the stem right before the bowl. The simplicity and appeal of his wooden spoons is definitely there, but the stem is where I am learning to slow down. After several spoons ending up with straight stems, I’ve seen the light on esthetic appeal of spoon stems with gradual curves. Leaving enough wood on the stem to work in a sweeping curve is my goal now.
Embarking on spoon carving is very appealing for many reasons, but I think the major aspect that I like is that it is eco friendly. If you make spoons you don’t have to discard or burn trimmed tree branches it is prime material for gobs of spoons. Plus you don’t need to drop a whole tree for stock. Pretty cool right there, but also sweet in terms of investment cost. If you pay attention to safety and once you acquire the basic tools, the processing time is short. Great for those woodworkers with limited shop time. As full time clergy that is one of my challenges to squeeze in my shop time and still see something get done.
Here is my most recent spoon and this time I made some strides on leaving enough wood on the stem and bowl to incorporate the sweeping gentle curves that are so distinctive on Swedish spoon carvings. I’ll be paying more attention to incorporating the gentle curve on the profile off the spoons as well. My spoons still seem too bulky, but I’ll be working on aspect as well.
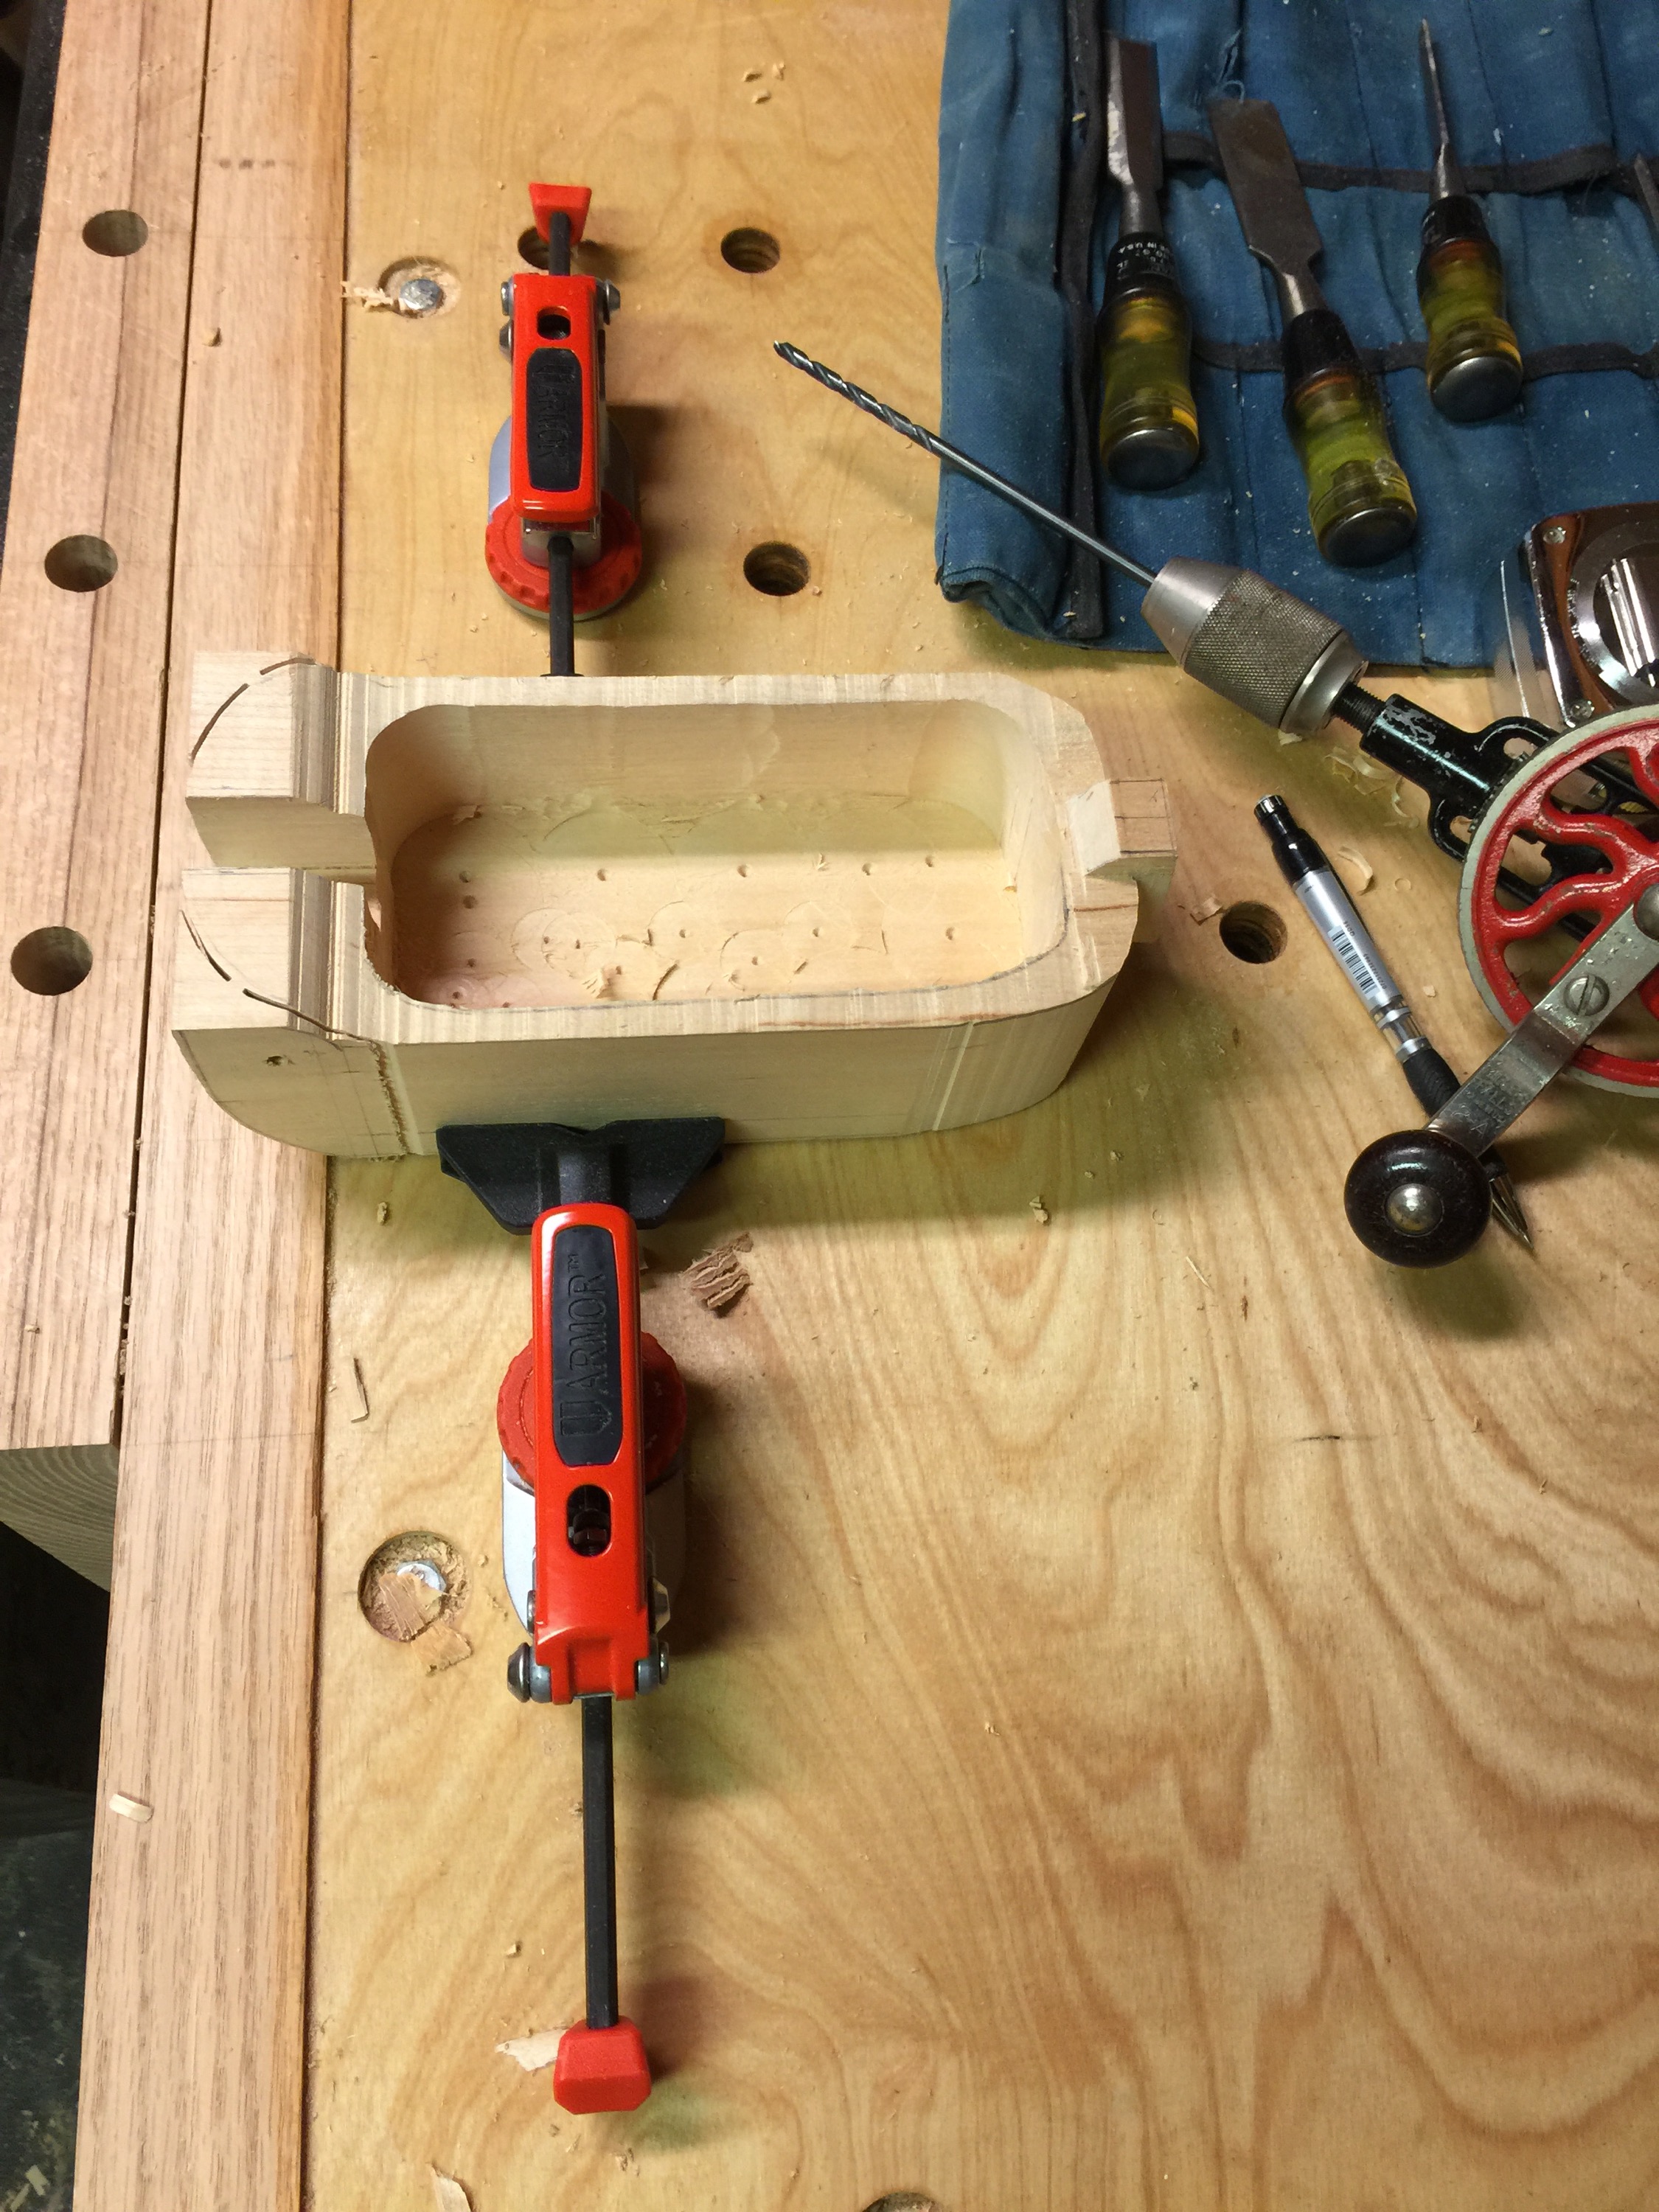
Hi Folks! Check out these new Armor Tool clamps (auto-adjust in-line dog clamps) that you can get at Woodcraft. I saw them in action at the Toledo store when one of the staff, Tom, used them in a demonstration for InLace (I also like InLace, although I realize this might be complete heresy to my fine woodworking colleagues who swear by inlaying ebony or use black dyed wood strips in period pieces.) I tried a pair of those bench dog clamps just the other day to hold a new carving project and let me tell you that they were truly superb in gripping and holding. I used them on my new bench and they are worth every penny in their utility. What I especially liked was the ease of adjustment for one thing. You see I was tempted to buy one or two Veritas bench dog clamps from Lee Valley Tools. I am a Veritas tool enthusiast and appreciate their quality and excellent design. But I like these Armor Tool clamps and can see myself using them quite often and I don’t regret putting in all the many dog holes in my new bench. I honestly bought these new
bench dog clamps for spoon making, but heh they’ll work in so many applications and that is cool!
Can’t decide yet if this oak frame and panel lid warrants some carving. It will cover the tool storage area in my chairmaker’s bench. I fashioned it in a similar way to the lid and compartment Chris Schwarz made for his Roubo bench. My thoughts are to do something minimal like add the date or a word or two in Roman style lettering in the center of the panel. Cutting the letters/numbers with chisels in the oak is my inclination. I haven’t tried that before with chisels, but this seems to be my motivation now. There is something classy about letter carving on flat surfaces. I’d go minimal because this lid may still get things stored on it. It really shouldn’t though as then the tools in that compartment are inaccessible. The panel is flush so it doesn’t have the raised edge, but for a tool storage lid it works here. It was a joy to cut these mortise and tenon joints in oak. The parts are assembled dry fit so I can work with carving the panel by itself. I really like the grain. A few spots are visible that will get cleaned with alcohol or mineral spirits. Any thoughts?
Recently, I stumbled into a real find at a garage sale. Barb and I were out looking at people’s junk and there it was a ugly painted saw that was done for the owner. I might like landscapes, but what I observed was a nice saw handle and saw plate with almost no wear. So for $3 I took it home and it sat on my drafting table as a painted saw for months.
A couple months later I had gotten sufficiently tired of the oil painting on it and it found itself in the garage being subjected to paint stripper. The stripper took off the painted scene and I soon noticed an etch from the manufacturer on the blade, HSB and Co. and it got more exciting. The painter had the blade sandblasted to remove rust, but the etch was still visible and the blade looked great. Some of the sandblasting work had damaged the handle too, but it wasn’t severe. I felt very fortunate here.
So here is the good news, I rescued from the painters brush a perfectly good saw that had very little use from its owner. The previous owner liked this premium Chicago made saw so much that his name H.M. Simpson was stamped all over the handle, but fortunately for me there is much life left in the saw plate.
After I removed the fall landscape scene and the flat black paint on the back side, I knew I was on the right track. I carefully removed the sandblasting texture from the plate with 220 sandpaper attached to a sanding block. The sanding block helped keep me above the etch and so I could preserve it for some future treatments to darken it. The apple handle was cleaned up of stray paint and then lightly sanded. To even out the color I applied a maple dye, gave it a good coat of boiled linseed oil, added 2 coats of garnet shellac, and then applied wax.
The saw nuts were originally nickel plated and most of that was lost in cleaning it up. I was able to preserve the nickel plating on the medalion.
I am thrilled with the condition of this handsaw, the way it cleaned up, and I can’t wait to sharpen this up and use it.
Here is a picture of my customized shaving horse. This is what I now use to make long tapered spindles, initially hand split oak from logs, for the backs of Windsor chairs. This particular shaving horse was made in the early 80’s when I really started to get into traditional woodworking using mostly hand tooks. Believe it or not, I made this shaving horse out of glued up wood recovered from oak pallets and a couple 2″ pine boards I purchased from a local lumber supplier. Initially, this shaving horse design was utilized by coopers to shape barrel staves, and I ended up using it to make Shaker ladderback chair parts. One of the limitations I experienced was that I had to always apply a very firm amount of foot pressure to secure the stock while I was using a drawknife and spokeshave.
After making Windsor chairs for the last several years, I finally realized the need for enhanced holding capability in this shaving horse. It was either that or make another one. Since I don’t have room for more than one shaving horse, I opted to modify this one. An article in Fine Woodworking Magazine, #139, featured a shaving horse designed by chair maker Brian Boggs, it helped me see how this could be done. So I borrowed some design concepts from Brian Boggs. I modified the clamping head by removing the top member which was held originally together with a thru mortise and tenon joint. I replaced the original top member with a 2-1/2″ diameter cylinder with 7/8″ round tenon ends. The round tenons extend all the way through the side arms and this allows the top member, which is now covered with rawhide, to turn and provide fresh clamping surfaces. The pressure I now apply between the rough rawhide covered top clamping member and the rawhide covered grooved platform should provide a much better grip when I am using the drawknife and the spokeshave to work chair spindles.
Last year, I read an article by Mike Dunbar in Popular Woodworking and it featured the benefits of making and using shooting boards. As someone who takes chairmaking classes with Mike at the Windsor Institute in Hampton, New Hamsphire, I have grown to really appreciate his woodworking talents as well as his humor. Suffice it to say that Mike’s article gave me the jump start that I needed after being a woodworker for many years. I think it also coincided with me selling my chop saw when I moved and my decision to restore an old Stanley 360 Miter box with saw. You see I had been aware of the benefits of using shooting boards ever since I bought Charles Hayward’s book on cabinetmaking back in the early 80’s, but it took someone else to motivate me to make some shooting boards and to appreciate the difference that they can make in enhancing ones woodworking skill. So between Mike’s article and all the posts and threads on the Neander section of Sawmill Creek Woodworking Forum, it was about time that I got with the program and made some shooting boards. Well thank God that time has arrived!
I guess some background on my love of using hand tools is in order. While I have been into using wood planes for years, I don’t have a good answer for why I didn’t get into making or using shooting boards. Maybe I thought that using a plane the proper way and keeping good technique was enough to give me edges that were 90 degrees to the board surfaces. I don’t know. What I can say is that I bought my first stanley #4 plane, painted in blue and red, when I was mowing lawns back in the mid 60’s. But it was in the late 70’s and early 80’s that I watched the Woodwright’s Shop with Roy Underhill and soon got fired up about buying and restoring old woodern planes. Since then I have been blessed to use a variety of wooden and metal planes and they are an integral part of how I build handmade furniture.
So last year I made three shooting boards and I have quickly discovered that they are awesome to use, both for trimming end grain and long grain. Since I don’t own a chop saw, I can cut a miter on a piece of trim on my Stanley 360 miter box and then plane it fit with the shooting board for mitered joints. Instead of struggling to get edges that are straight for say a drawer, I can also get them to be at 90 degrees to the board face. That is way cool and it helps make me a better woodworker/furniture maker.
Here is another thing, I followed Mike’s advice about the benefits of using a dedicated Bedrock 605 plane for shooting. They are hard to locate, but you can still find them if you are on Ebay or in antique stores. I bought one in an antique store and I spent some time cleaning it, draw filing out a high spot just behind the throat, and then flattening the sole on a 3 foot long piece of 3/8″ thick glass with 80 and 120 grit sandpaper on it. I soon realized the need to draw file the one side to get it at 90 degrees as well. It just took some unrushed time of filing, sanding and checking the edges with a precision straight edge and a couple machinist squares. I also upgraded the plane with a Hock Replacement iron in A2 steel and a thicker cap iron, which enhanced its capabilities too.
Lee Valley Low Angle Jack Plane
It gets better. Recently, Barb and I made it to the Woodworkers Show that was held in Columbus, Ohio at the Expo Center. I have been a fan of Lie-Nielsen planes for years, but heh the Lee Valley booth at the show gave me the opportunity to test drive a Low Angle Jack Plane (LV LA Jack) and boy was I ever impressed. Make no mistake, I think, like most neanders, that Lie-Nielsen and Lee Valley make great tools. Yet this time I was taken by the heft and the feel of the Lee Valley Veritas plane and I love using it. It might be my favorite woodworking plane and now that I have shooting boards, it is mighty cool to use. Thanks for listening to me ramble, but heh woodworking is in my blood and it gives me a great escape from the pressures of caring for my flock. If you want to see me use the LV LA jack on a shooting board, I put together a quick video on Youtube and you can see it here
Top dyed antique cherry and sealed with polyurethane
Hi everyone. Here are some pictures of the 18th Century Campaign Table that I recently finished. It turned out quite well with the antique cherry stain, polyurethane coating on the top and the lexington green milk paint on the aprons and legs. I’ve learned a lot in making this project and hope to refine the leg profile design and the latching mechanism for securing the leg and apron assemblies. All in all, I am pleased that the design has the look of an 18th century piece, achieved the lightness sought by my client, and can be folded up easily for trips to reenactments.
Take care,
Jim
Side View of 18th Century Style Folding Table
Front view showing the apron design
Table is partially folded up to show the design.
Underside of the folding table showing the locking mechanism.

 If you like 17th Century carving on oak boxes then you know about using a steel stamp on the backgrounds. I’m now a dabbler in making punches that can stamp a Maltese cross or add a decorative background on my carvings. So far I’ve made two punches for stamping a Maltese cross using some drill rod. However, those now seem oversized so I used smaller diameter materials to make two more. I also invested in a couple knife shaped files for cutting the rest of my steel stamps. My last two stamps were made using a worn out screwdriver and a large cut nail. It is harder than it looks to carefully file away the metal so it gives you the desired impression when struck with a hammer.